DTF Transfer Application: Step-by-Step Guide for Beginners
Essential Materials for DTF Transfer Application
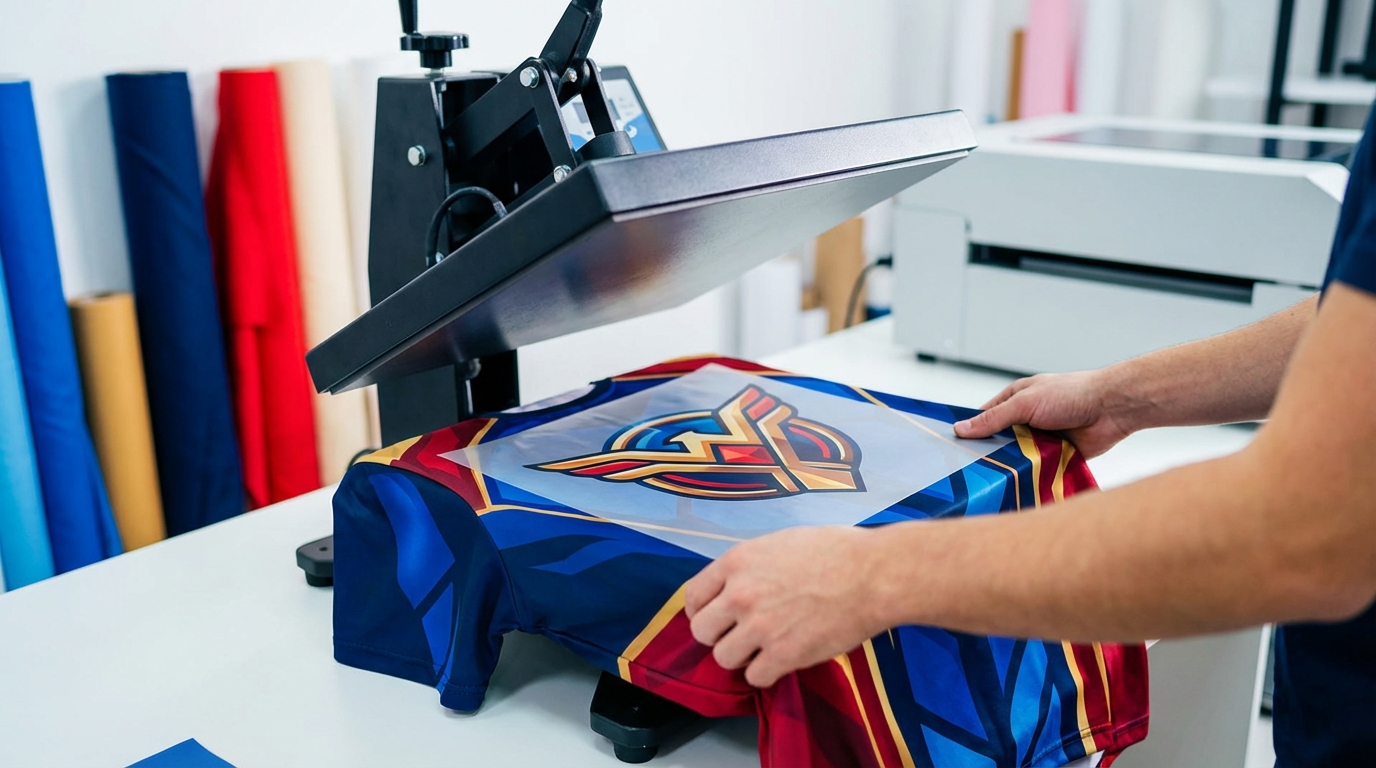
Before you begin the dtf transfer application process, gather all the necessary materials. Having everything on hand will ensure a smooth and efficient workflow.
hero
DTF Transfers: Pre-printed with your desired designs.
Heat Press: A reliable heat press capable of maintaining consistent temperature and pressure. [INTERNAL_LINK: best heat press for DTF transfers]
Heat-Resistant Tape: To secure the transfer in place (optional, but recommended).
Teflon Sheet or Parchment Paper: To protect the garment and heat press platen.
Lint Roller: To remove any lint or debris from the garment.
Heat Gloves: To protect your hands from the hot heat press.
Scissors or Cutting Tool: To trim excess film around the transfer (if necessary).
Spray Bottle with Water: For pre-treating certain fabrics (optional).
Step-by-Step DTF Transfer Application Process
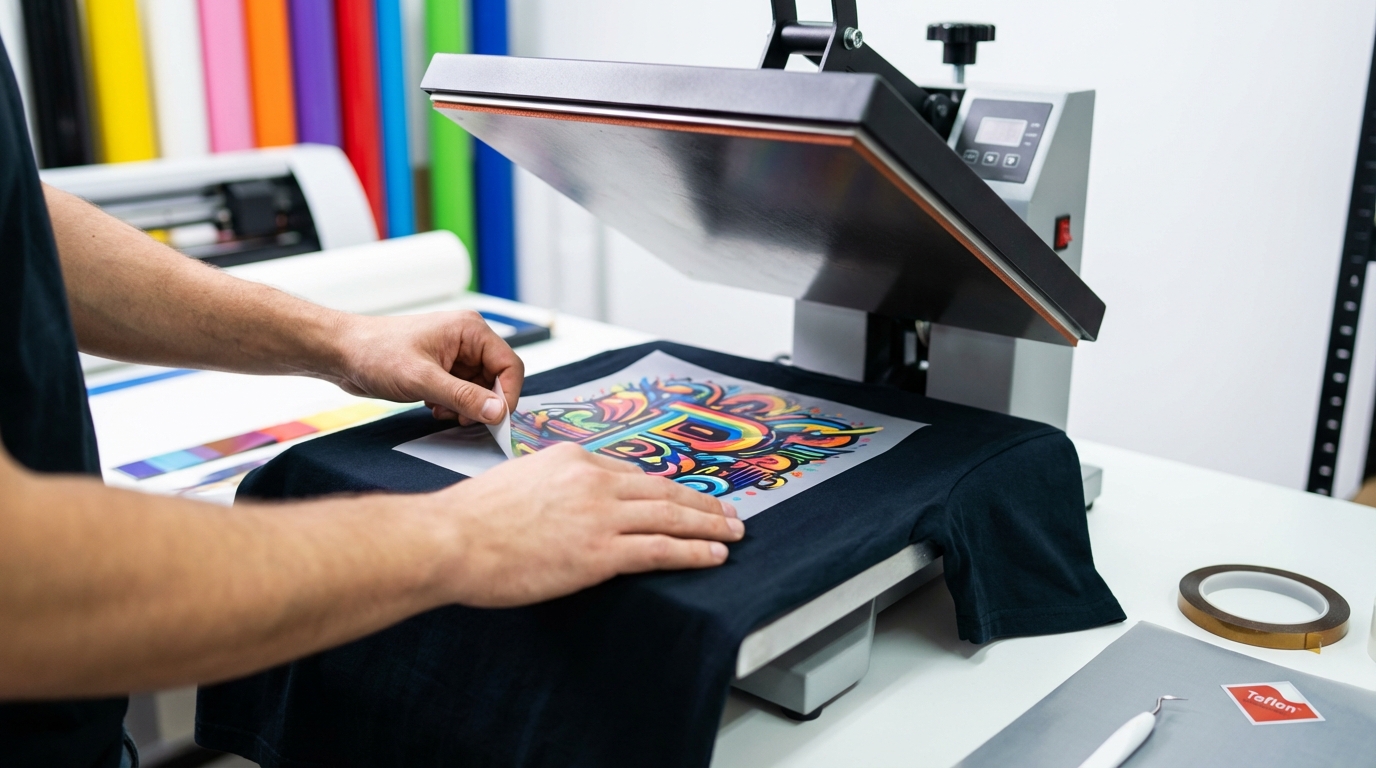
Follow these steps for a successful dtf transfer application:
step-by-step
Prepare the Garment: Use a lint roller to remove any lint or debris from the fabric surface. If necessary, pre-treat the garment with a light mist of water to improve adhesion (especially for dark-colored fabrics).
Position the Transfer: Place the DTF transfer onto the garment in the desired location. Use heat-resistant tape to secure the transfer in place, ensuring it doesn't shift during the pressing process.
Protect the Transfer: Cover the transfer with a Teflon sheet or parchment paper to prevent direct contact with the heat press platen. This will protect the design and prevent ink from transferring onto the platen.
Apply Heat and Pressure: Close the heat press and apply the recommended temperature and pressure for the specified time. Refer to your DTF transfer supplier's instructions for the optimal settings.
Peel the Film: Once the pressing time is complete, carefully open the heat press and remove the Teflon sheet or parchment paper. Depending on the type of DTF transfer (hot peel or cold peel), either peel the film immediately while it's still hot or allow it to cool completely before peeling.
Re-press (Optional): For added durability and a smoother finish, re-press the design for a few seconds with the Teflon sheet or parchment paper in place.
[IMAGE: Step-by-step photo series showing each stage of the DTF transfer application process, from preparing the garment to peeling the film]
Optimizing Heat Press Settings for DTF Transfers
The correct heat press settings are crucial for achieving a successful dtf transfer application. Temperature, pressure, and time all play a significant role in the final outcome. Here's a breakdown of each setting:
Temperature: As mentioned earlier, the ideal temperature range is typically between 285°F and 320°F (140°C to 160°C). Always consult your DTF transfer supplier's instructions for the most accurate temperature recommendation.
Pressure: Medium to firm pressure is generally recommended for DTF transfers. Too little pressure can result in poor adhesion, while too much pressure can damage the transfer or the garment. Experiment with different pressure settings to find the optimal balance.
Time: Pressing time usually ranges from 10 to 20 seconds. Again, refer to your DTF transfer supplier's guidelines for the most accurate timing.
Factors Affecting Heat Press Settings:
Fabric Type: Different fabrics may require slightly different heat press settings. For example, delicate fabrics like rayon may require lower temperatures and shorter pressing times.
DTF Transfer Type: Different DTF transfers may have different requirements for temperature, pressure, and time. Always follow the specific instructions provided by your supplier.
Heat Press Model: Different heat press models may have slightly different temperature calibration. It's always a good idea to test your heat press with a temperature strip to ensure it's accurately displaying the temperature.
Troubleshooting Common DTF Transfer Issues
Even with careful preparation, you may encounter some challenges during the dtf transfer application process. Here are some common issues and how to troubleshoot them:
Transfer Not Adhering: This can be caused by insufficient heat, pressure, or pressing time. Increase the temperature, pressure, or pressing time slightly and try again. Also, ensure that the garment is clean and free of any lint or debris.
Transfer Peeling After Washing: This is often due to improper curing of the adhesive. Re-press the transfer for a longer duration or at a slightly higher temperature. Also, make sure to follow the recommended washing instructions for DTF transferred garments.
Bleeding or Fading Colors: This can occur if the temperature is too high or the pressing time is too long. Reduce the temperature or pressing time and try again. Also, ensure that you are using high-quality DTF inks and transfers.
Uneven Transfer: This can be caused by uneven pressure on the heat press platen. Make sure the garment is flat and evenly distributed on the platen. You may also need to adjust the pressure settings on your heat press.
Film Not Peeling Cleanly: This can be due to incorrect peeling method (hot peel vs. cold peel). Ensure you are using the correct peeling method for your specific DTF transfer. If it's a cold peel transfer, allow it to cool completely before peeling.
Caring for Your DTF Transferred Garments
Proper care is essential to prolong the life and vibrancy of your DTF transferred garments. Follow these guidelines:
Wash Inside Out: Turn the garment inside out before washing to protect the design.
Use Cold Water: Wash in cold water to prevent fading and bleeding of colors.
Use Mild Detergent: Avoid using harsh detergents or bleach, as they can damage the transfer.
Tumble Dry Low or Hang Dry: Tumble dry on low heat or hang dry to prevent shrinkage and damage to the transfer.
Do Not Iron Directly on the Design: If ironing is necessary, iron inside out on a low setting and avoid ironing directly on the design.
Frequently Asked Questions
Here are some frequently asked questions about dtf transfer application:
What temperature should I set my heat press for DTF transfers?
How long should I press DTF transfers?
What is cold peel vs. hot peel for DTF transfers?
Can I use a regular iron instead of a heat press?While a regular iron can be used in a pinch, it's not recommended for DTF transfers. Heat presses provide consistent temperature and pressure, which are essential for proper adhesion.
How long do DTF transfers last?With proper care, DTF transfers can last for 50 washes or more.
Conclusion
Mastering the dtf transfer application process opens up a world of creative possibilities for garment decoration. By following this comprehensive guide and paying attention to detail, you can achieve professional-quality results and create stunning custom apparel. Remember to always consult your DTF transfer supplier's instructions for the most accurate settings and recommendations. With practice and patience, you'll become a DTF transfer expert in no time. Ready to take your DTF skills to the next level? Explore our advanced DTF printing techniques [INTERNAL_LINK: topic] and start creating even more impressive designs today!


Leave a comment